How to glaze the whole ceramic spoon
There’s one question I keep getting via Etsy, on this blog and through email. “How do you glaze your ceramic spoons and keep them from sticking to the kiln shelf?” Clearly, there is a lot of interest in handmade spoons!
So how do you glaze the entire ceramic spoon?
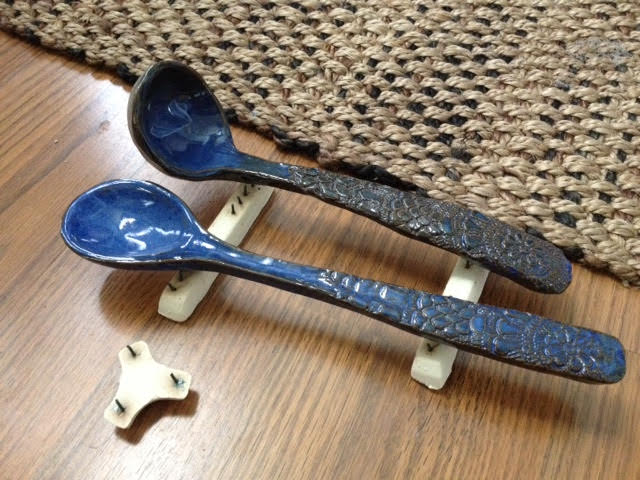
I use kiln stilts! Kiln stilts consist of metal rods that prop up a piece off the shelf, and a durable one may be used multiple times. I purchased Roselli stilts from Big Ceramic Store. According to Big Ceramic Store, beyond cone 6, metal rods may begin to deform, and may deform at lower temperatures under heavy weights, so stilts are best used for light-weight pieces. You can also increase the number of stilts to spread out the weight distribution, but this will result in more spots you need to sand down. This Small Stilt Kit is a great way to get started and experiment with what works best for you. Be sure to check how hot the stilt can be fired to before you buy a set. Cone 6 is 2232°F. When in doubt on a product’s rating, call up the supplier and ask.
For firing my spoons, I’ve mainly used the straight line stilts, but I have also tried the three pronged ones under the bowl of the spoon. I fire at cone 5 and haven’t had too much trouble with slumping, although someone once told me that at cone 6 their spoons would bend in the middle. You could add an extra stilt to support the middle. Of course, if none of the commercial ones work for you, you could always get some heat tolerant pins and make your own. I have not tried this yet, so if you do, give me feedback! See the Orton Pyrometric Cone Chart here.
This is how I prop up my spoons with stilts. Please forgive that they are finished spoons and this is my hallway floor, but it should give you a good idea how the setup works.
The point of contact usually leaves a sharp spot that has to be buffed out after firing. Results are generally better if the stilts are clean and the glaze isn’t very thick where the spoon rests on the stilts.
It’s been suggested that I could use my bead tree to hang spoons for the glaze firing, but I haven’t tried that yet. The spoons I make are probably too heavy for the wire, and these spots on the back of the spoon are easier to shine up than a rough hole.
I hope this helps!
This post contains affiliate links. Purchases made through my affiliate links give me a small commission to help run this blog, but don’t cost you any extra.
Other projects:
Making Ceramic Ornaments with Cookie Cutters http://www.lovesown.com/2014/11/making-ceramic-ornaments-with-cookie.html
Hand Building Projects: http://www.lovesown.com/2013/02/hand-building-projects.html
Lace Imprint Casserole: http://www.lovesown.com/2017/01/hand-building-project-lace-imprint.html


6 Comments
Lori Buff
If you make your own stand for the spoons you can also have some control over the curve.
Paige Puckett
Great point, Lori. Also, gorgeous work! I just followed your blog.
Jessica bonner
I’m looking for a good alphabet stamp set. I really like the set that you’re using. Can I ask where u got yours?
Thank you!
Beautiful work!
Jessica Bonner
Paige Puckett
I found mine on Etsy years ago 🙂
Samantha Faint
How do you buff out the little holes?
Paige Puckett
Kemper Stilt Mark Stone