Making a Bead Tree for the Kiln
My newest ceramic project has been making pendants using lace imprints. While I only glaze one side of star ornaments, pendants, I felt should be glazed all the way around. After all, whenever I wear jewelry, it always manages to flop around to the wrong side. Therefore, I needed bead tree, but after spending hours trying to find the most affordable option that also made sense for pendants, I came up empty. Amazon has two available — Small Bead Rack w 4p 6″wire and 12 Piece Bead Tree Rack
 . Even the sturdy replacement wires for the commercial bead trees were costly to purchase.
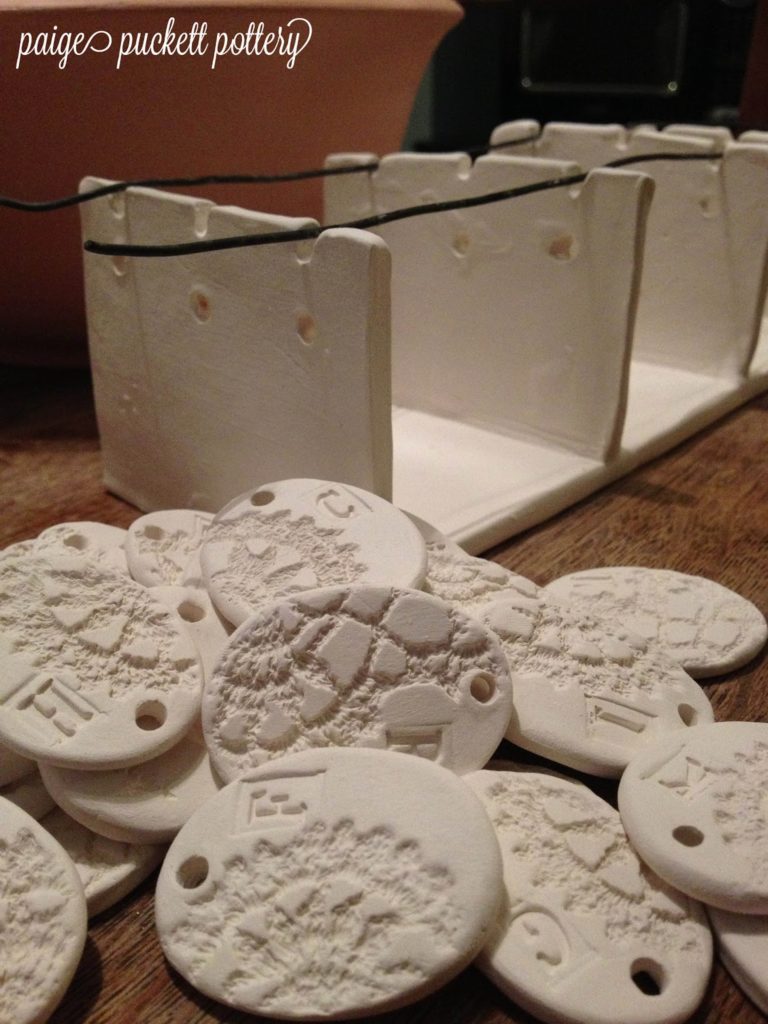 |
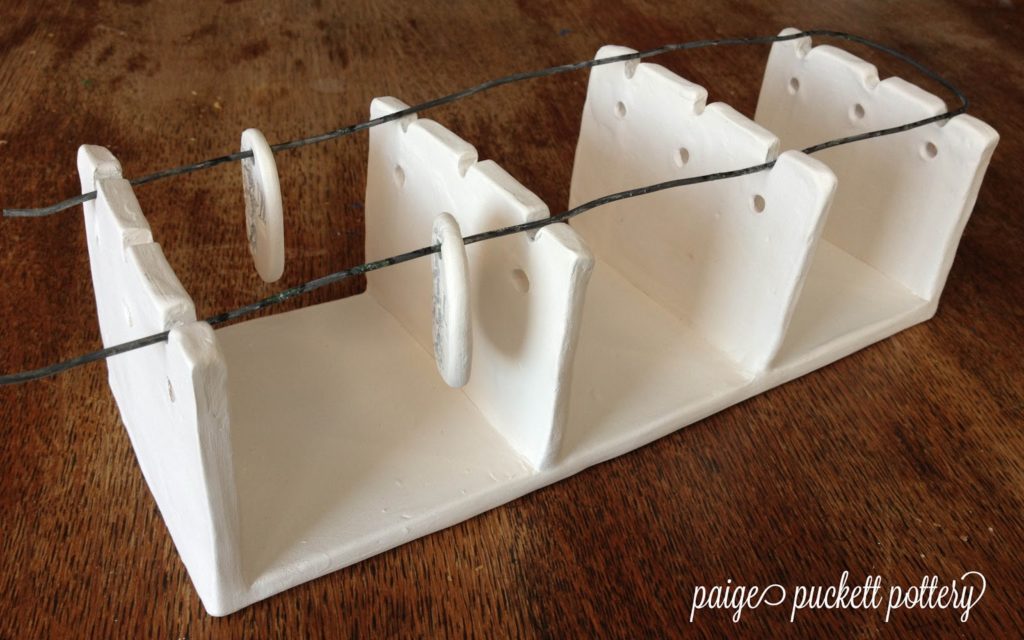
| This is my original bead tree design. Please don’t reproduce this for sale. Thanks! |
So I decided to make my own. I found Nichrome, 14 gauge wire on eBay, the same wire used in the high-fire stilts I bought, and ran one load with it propped on kiln posts. The wire sagged when the span between posts was larger 3″, and the posts were prone to falling over, especially when stacked (I’d run out of tall ones). I lost a few pendants on that first firing, but there was good information learned: 1) I needed a short span with a prop that wouldn’t shift, and 2) I needed tile protection for my kiln shelves.
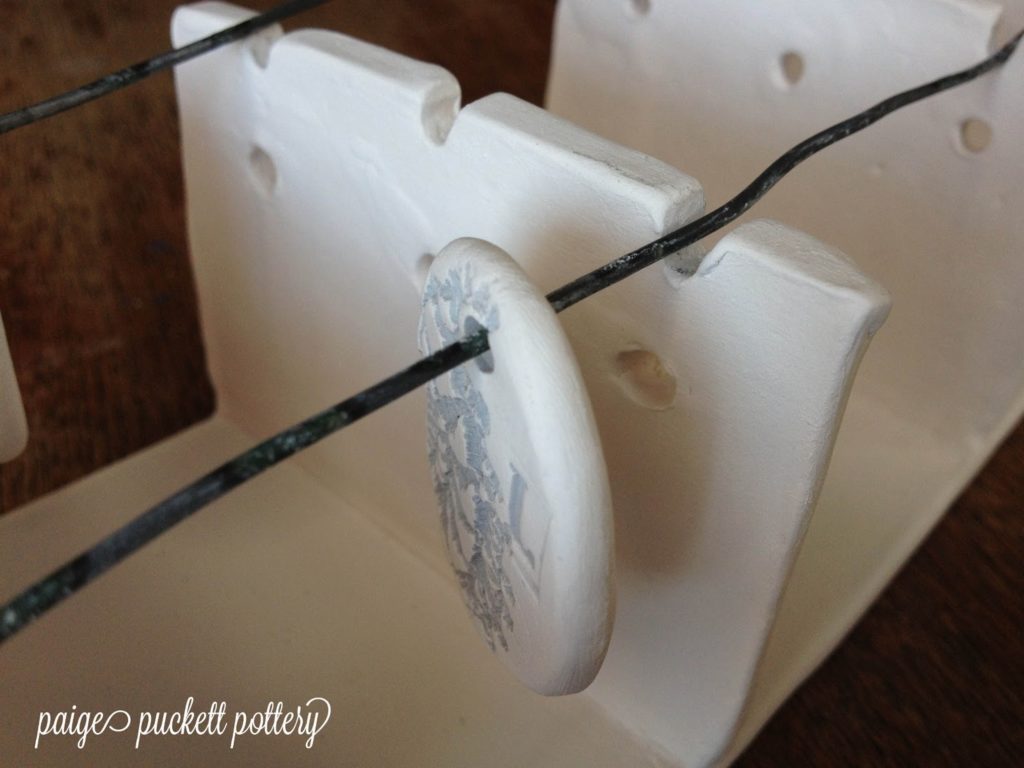
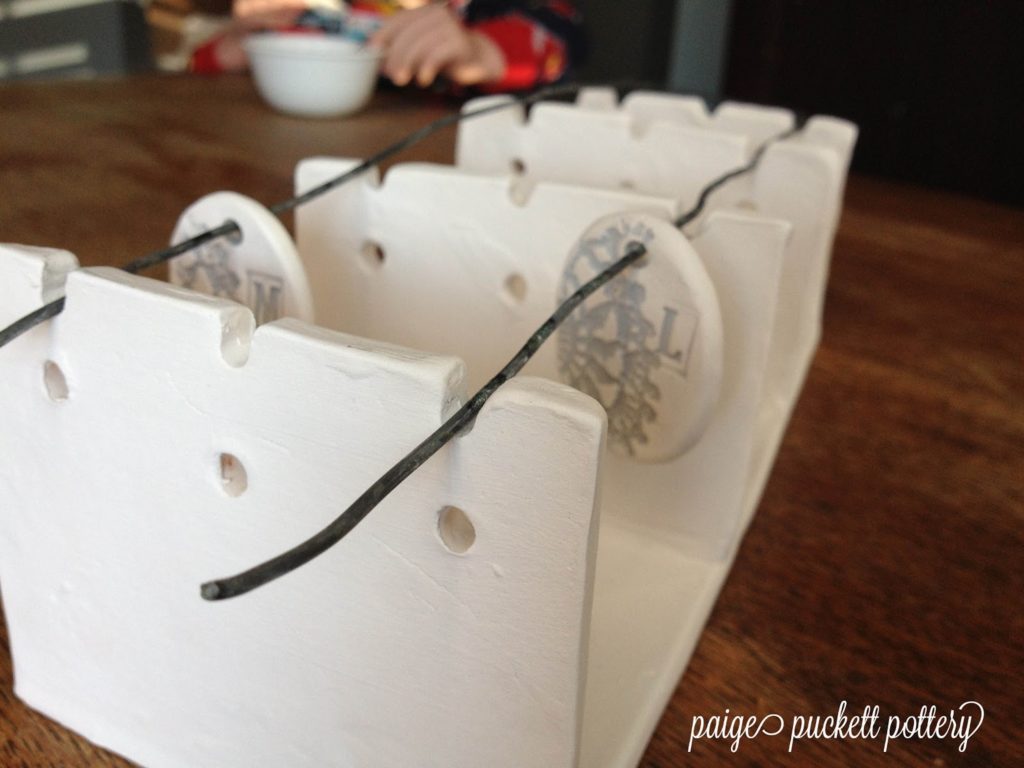
The width of my kiln shelves determined the size of my bead tree. I have 20″ x 10″ half rounds. My finished bead tree is 10″ long, 4″ wide and 2 3/4″ tall. The span between the four vertical supports is 3″. At first I cut out holes to run the wire through, but then considered it would be easier to load up the wire and let it rest in grooves. I also intially made the design for two parallel wires, but added a center run in case I needed to fire wider pieces in the future or wanted to sneak in a row of little beads between the pendants. The setup provides some flexibility of use. The long horizontal slab that the tree is built on provides the kiln shelves protection from accidental drips.
How to build a bead or pendant tree. Shucks, let’s call this bit a “Pendant Castle”.
** This is my original design. Go make one for your own use, but please don’t reproduce this for sale.**
1. Measure your kiln shelf and determine how you will orient your pendant castle on the shelf and choose the desired length of your castle and number of vertical supports needed. I could have made mine much longer, but I wanted to be able to turn it on the short side and leave room for other pieces on the shelf, so I went with 10″ wide. With an approximate 3″ span, this required four vertical 1/4″ thick vertical supports.
2. Determine the needed height of your vertical supports. My pendants are usually not taller than 2″, but most have been 1.75″. Figure that the hole for the wire will be about 1/2″ down from the top edge and leave 1/2″ clearance at the bottom. This is the height of your center supports. Add in another 1/4″ inch for the thickness of the castle base, and you will have the height of your end supports.
3. Determine the needed width. My outer holes are 2 1/4″ apart. This leaves room to run two wires of 2″ wide pendants at a time. Granted, they would extend beyond the drip base on the outer edges, but I’ll forgive them that. I’m currently making oval letter pendants that are only 1″ wide. If you want to add a third wire, figure in your desired pendant width with an extra 1/2″ clearance (1/4″ for each side).
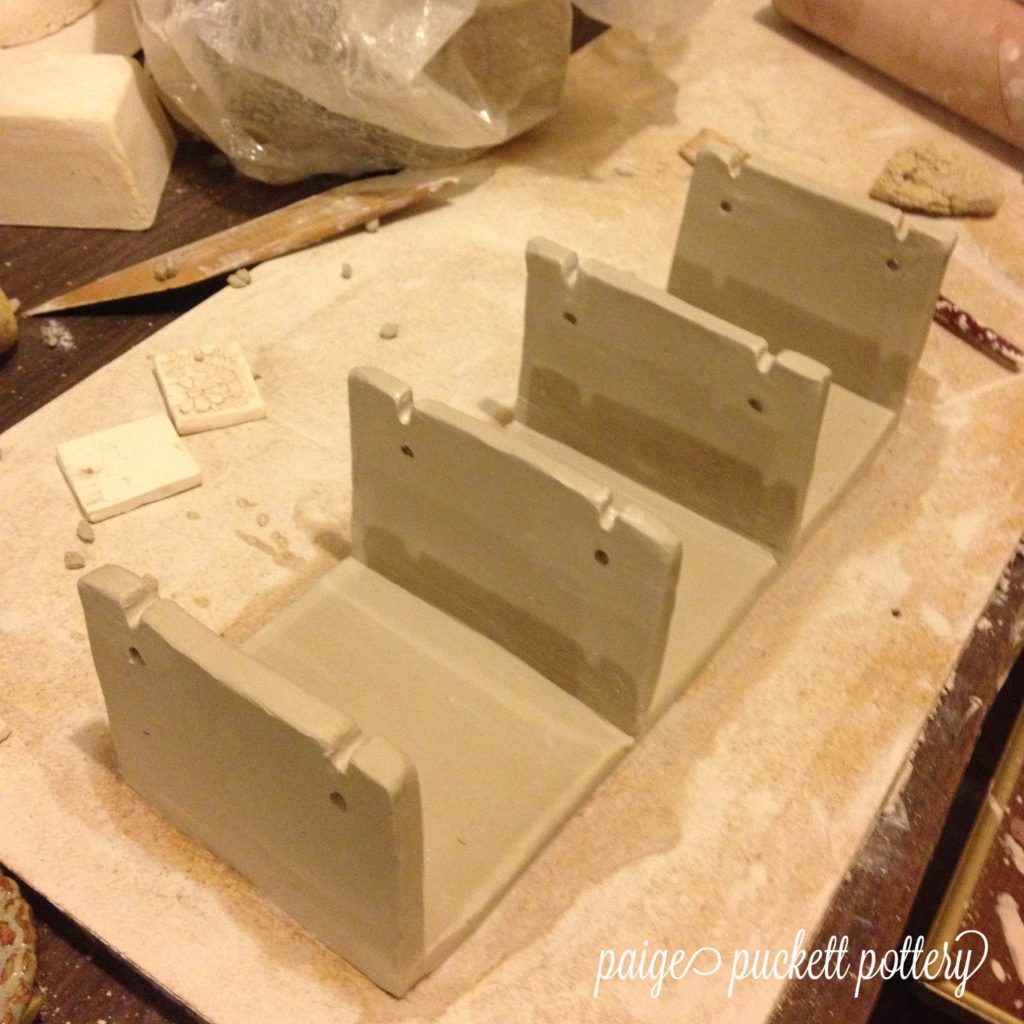
4. Roll out a 1/4″ thick slab and cut out your base and walls. Since I wanted 10″ total length, I ended cut out a 9 1/2″ long by 4″ wide base. (TIP: Don’t lift the base up. If you pull it off your work table, it may not lay flat after it is fired. I rolled it and left it alone until it was firm enough to turn the whole castle over so I could clean up the edges.) I then cut two 4″ x 2.75″ vertical supports for the ends and two 4″ x 2.5″ supports for the middle. Here’s where I went wrong – I attached them to the base slab BEFORE cutting out holes. Don’t do that. Mark where your holes need to be and punch them out before building the castle.This is the same if you choose to use grooves on the top edge, though they are easier to add later. Depending on how fresh your clay is, score and slip or just gently compress the joints together. The reason I chose to attach the end supports to the outer edge of the base has to do with the moment arm. If that wire got heavy, the outer supports would have a little more protection against that pulling rotation. (There was a little engineering for you… alas, education not wasted after all.)
Other projects:
Making
Ceramic Ornaments with Cookie Cutters http://www.lovesown.com/2014/11/making-ceramic-ornaments-with-cookie.html
Ceramic Ornaments with Cookie Cutters http://www.lovesown.com/2014/11/making-ceramic-ornaments-with-cookie.html
Hand Building Projects: http://www.lovesown.com/2013/02/hand-building-projects.html
Lace Imprint Casserole: http://www.lovesown.com/2017/01/hand-building-project-lace-imprint.html
This post contains affiliate links. Purchases made through my affiliate links give me a small commission to help run this blog, but don’t cost you any extra.


30 Comments
Whitney
You are brilliant.
And if I were you (which I'm so clearly not), I'd put that blurb at the bottom right up at the top of the post instead: "This is my original design. Please don't reproduce it for sale."
PricklyP
Thanks for this very neat DIY! Just a question, does the nichrome 14 gauge hold up at cone 8? I'm new to making beads & am itching to try making a batch of porcelain beads.
paige.puckett
Nichrome's melting point is 2552 °F, so you should have a little wiggle room. The wire might sag a little more the higher up the temp goes. http://www.bigceramicstore.com/info/ceramics/cone-chart.html
L. Tucker
This looks like exactly what I need! What kind of clay did you use to make it? I am an elementary with very little clay experience, but I would really like to make Egyptian medallions with my students.
paige.puckett
I used Little Loafers which is a cone 5/6 clay.
L. Tucker
Thanks! Do you still need to use kiln wash on it?
paige.puckett
I didn't, but I bet that would help a lot on the wire. The glaze caused many to stick. I also had several bend into each other and stick. Generously space them! My boys already broke my bead stand, so I will have to make another. I'll likely make it larger in all dimensions this time.
L. Tucker
Thank you so much for a really great idea and for the kind advice!
AkelaRene
This is GREAT! I've been looking at doing this but just didnt get to it … now I know I will … thank you for posting and it's a good idea to remind everyone that when we share and idea to use … don't abuse the idea … the kids Im working with will be thrilled to see their beads …. THANKS agaiin
paige.puckett
Yay! I'm glad to share.
Andrea
Thank you for this! I was just coming to the conclusion that I needed to fashion something-er-other to hold up my students Christmas ornaments- this will save a lot of time! Wonderful 🙂
paige.puckett
You are welcome! I just made a new one with an updated design. http://www.lovesown.com/2013/11/making-bead-tree-for-kiln-part-two.html
Claire Newton
This is great idea, I run a ceramics class in a hospital unit and many of my patients can only manage a small project like a hanging decoration so this idea means I can fire a good few individuals work in one go. thanks
Paige Puckett
I love that! What an awesome way to care for people.
dollyin08
Thanks for sharing. Do you only need to bisque fire the bead tree? or have to go through a second firing? How should I fire the bead tree if the glaze I use for beads is cone 5/6 glaze ?
Paige Puckett
I think I only bisqued before I used it for the first time because I'm impatient.
Tammie Kinley
Love this idea, thanks for sharing!
Paige Puckett
You are welcome!
Johnnygo73
What kind of wire were used ? homebrewer7@gmail.com
Paige Puckett
Nichrome 14. Check ebay!
LustingWanderluster
I'm finding different diameters of 14 gauge nichrome wire. Do you know if the diameter matters to the performance of the wire in the kiln? May I ask what diameter you use? Thanks.
Paige Puckett
I honestly don't know the answer to either question. Here's the product I purchased: http://www.ebay.com/itm/Nichrome-wire-14-gauge-10-feet-/221173343723?hash=item337ef565eb
LustingWanderluster
Thank you, Paige.
Marla James
Great bead rack. You might want to use an higher Cone clay with Grog in it for it to last longer. If you normally fire to Cone 6, for example, you will want to use a cone 8 or cone 10 clay body. This will make a really long lasting bead rack. And as for the wire Guage question. The lower the guage number, the larger diameter the wire is. For use on a bead rack, I suggest an 11guage or a 9 guage. These are considered bead rods. I sell them in my store. Cheapest online. 🙂
Paige Puckett
Thanks for the tips!
Kepola In-LV
You're brilliant! I love that you can personalize it to accommodate different size pieces of work. I'm wondering…and I'm new to the medium…can you fire multiple racks at the same time by crisscrossing the stands within the kiln or would each need to be on their own shelf? Thank you for saving all of us money and especially for the clear, concise instructions. You rock!
Paige Puckett
You could design and arrange yours in whatever way makes the best use of your space. If you are heavy on the glaze, you might have to worry about dripping on the kiln shelves if you criss-cross from one stand to another.
Kepola In-LV
Thank You Paige!
Nancy
Great idea, thanks!
Kelley Cary
Thank you for the brilliant idea. I was struggling to find what I needed and this is perfect. I made one following your directions and used it once. My second “batch” is in the kiln right now. I did notice that a couple of the walls have warped a little, so I may use a little bit thicker clay if I make it again. Also, you are right a little bit of sag in the wire. I may try a thicker wire next time as well. I am so grateful that you were willing to share your terrific idea! It made my ornament glazing possible. Thanks friend.